

In PCB design, sometimes we will encounter some single-sided design of the board, that is, the usual single panel (LED class light board design is more); In this type of board, only one side of the wiring can be used, so you have to use a jumper. Today, we will take you to understand the PCB single-panel jumper setting specifications and skills analysis!
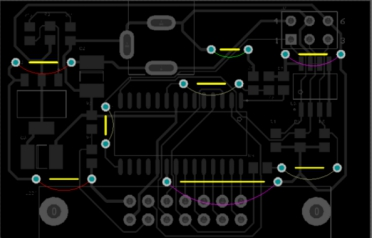
In the following figure, this is a board that is routed on one side by a jumper designer.
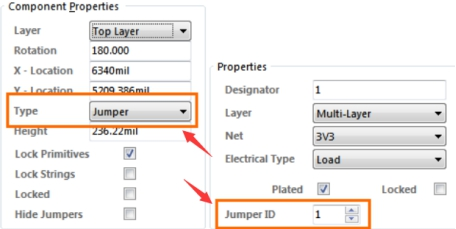
First. Set the jumper requirements
1. Component type to set as jumper.
2. The jumper ID of the two plates in the jumper wire assembly is set to the same non-zero value.
Note: Once the component type and liner jump properties are set, the component behaves as a jumper.
Second. How to use a jumper
After completing the above steps, there is no automatic network inheritance at this stage; After placing a jumper in the work area, you need to manually set the net property for one of the pads in the pad dialog box.
Note: If the component is defined as a jumper, the other liner will automatically inherit the same screen name.
Third. Display of jumper
In older versions of AD, the View menu includes a new jumper submenu that allows control over the display of jumper components. And add a submenu to the netlist pop-up menu (n shortcut), including options to control the display of jumper connections.
Post time: Apr-22-2024


